How to Make a Stickles Color Chart for Your Craft Room
If you have a collection of Stickles glitter glue, you probably already know how difficult it can be to remember exactly what each color looks like once it has been applied and dried.
The color on the bottle doesn’t always tell the whole story. Some colors have more sparkle, some are more transparent, and some look completely different once they’re on a project.
That’s why I created a Stickles color chart to keep with my craft supplies.
Instead of guessing which color I want to use, I can look at my completed color chart and see the actual glitter glue colors side by side.
It’s a simple little craft room organization project, but it can make choosing colors so much easier.
Why Make a Stickles Color Chart?
When you have several colors of glitter glue, it can be hard to keep track of them.
You may find yourself pulling bottles off the shelf, opening them, and trying to remember what each color looks like.
A color chart gives you a quick visual reference.
Once you apply a small sample of each color to the chart and allow it to dry, you can see how your actual colors look on paper.
A Stickles color chart can help you:
- Keep track of the colors you own
- Compare similar colors
- See the glitter and sparkle of each color
- Choose colors for upcoming projects
- Avoid buying duplicate colors
- Keep your craft supplies organized
- Quickly find the color you need
It’s especially helpful if you have a larger collection of Stickles or use glitter glue regularly for card making, scrapbooking, paper crafts, and other DIY projects.
What Is a Stickles Color Chart?
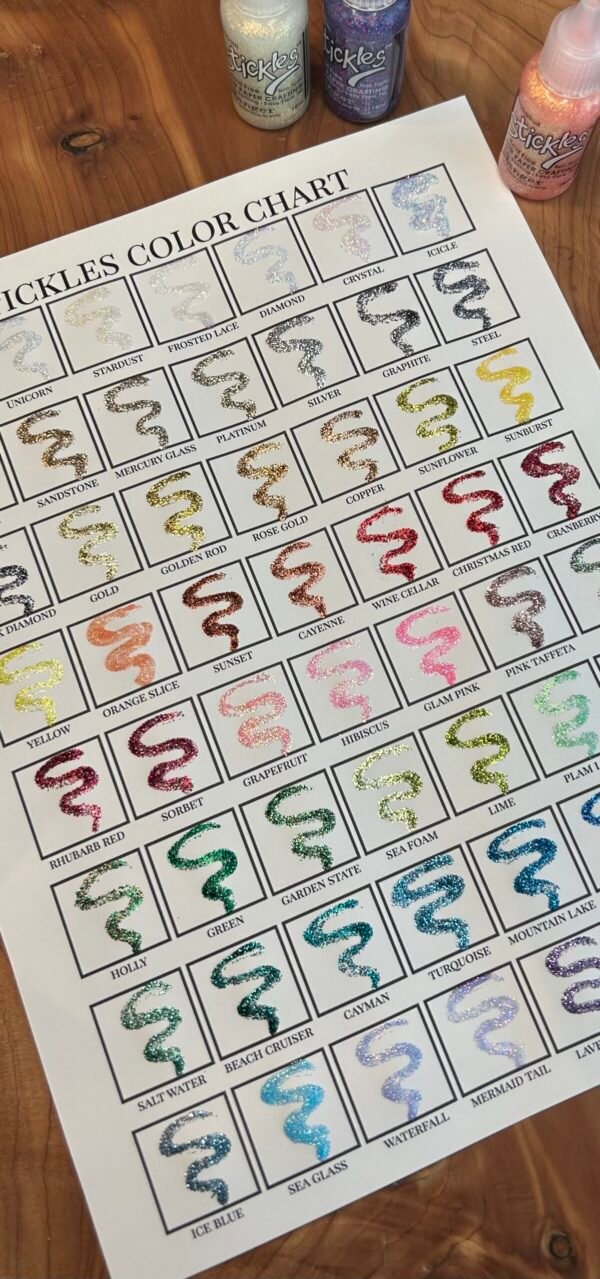
A Stickles color chart is simply a reference sheet where you apply a small sample of each glitter glue color.
Instead of relying on the color printed on the bottle, you’re creating a sample using the actual product.
This makes your chart much more useful because you’re able to see the color, glitter, and coverage on the same type of paper you use for your craft projects.
I created my printable chart with 56 labeled one-inch swatch spaces.
Each space is labeled with a color name so you can apply your Stickles to the corresponding square.
Once the samples are completely dry, you’ll have a personalized color reference that you can keep with your craft supplies.
What You Need
Making your own Stickles color chart doesn’t require many supplies.
You’ll need:
- A printable Stickles color chart
- Cardstock
- Your Stickles glitter glue colors
- A flat surface for drying
- A pen or pencil if you want to add additional notes
Optional Supplies
You may also want:
- A binder or folder for storing your chart
- Page protectors
- A small container for organizing your Stickles
- Labels for your bottles or storage containers
How to Make a Stickles Color Chart
Step 1: Print Your Color Chart
Start by printing your color chart on cardstock.
I recommend cardstock rather than regular printer paper because it gives you a sturdier surface for applying the glitter glue.
It also makes your finished chart easier to handle and store.
If you’re printing from home, make sure your printer settings are set to the paper size you’re using.
Step 2: Gather Your Stickles Colors
Gather the Stickles colors you want to add to your chart.
You don’t necessarily have to do the entire collection at once.
If you have a lot of colors, you can work on the chart a few at a time.
It’s also helpful to keep your bottles nearby while you’re making your swatches so you can match each color to the correct labeled square.
Step 3: Apply a Small Amount of Glitter Glue
Apply a small amount of Stickles to the corresponding labeled square.
You don’t need to completely fill the square.
A small sample is enough to show the color and sparkle.
Try to apply approximately the same amount of product to each square so you can compare the colors more easily.
Don’t worry if the samples aren’t perfectly identical. The goal is to create a useful visual reference for your craft supplies.
Step 4: Let the Samples Dry Completely
This is an important step.
Allow your Stickles samples to dry completely before judging the colors.
Glitter glue can look different while it is wet compared with how it looks after it has dried.
Place the chart somewhere flat where it won’t be disturbed while the samples are drying.
Avoid stacking anything on top of the chart until you’re sure the glitter glue is completely dry.
Step 5: Compare Your Colors
Once your samples are dry, take a look at your completed chart.
This is where the color chart becomes really useful.
You’ll be able to compare colors side by side instead of trying to remember what each bottle looks like.
You may even discover that two colors you thought were very similar actually look quite different when they’re applied.
How to Use Your Stickles Color Chart
Once your chart is finished, keep it somewhere that’s easy to access.
You can store it:
- In your craft room
- With your Stickles collection
- In a scrapbook supply organizer
- Inside a craft binder
- In a page protector
- With your card-making supplies
Then, when you’re working on a project, simply pull out your color chart.
Instead of opening several bottles to compare colors, you can look at your completed swatches.
This can save time and make choosing colors much easier.
Keep Your Stickles Collection Organized
A color chart can also help you organize your craft supplies.
As you create your swatches, compare the colors you have with the bottles in your collection.
You may find colors you forgot you owned!
You can also use your chart when shopping for new colors.
Before purchasing another bottle, check your chart first to see whether you already have something similar.
This is a simple way to keep your craft supply collection from getting unnecessarily large.
Why Swatching Your Actual Glitter Glue Matters
One of the biggest benefits of creating a physical color chart is that you’re seeing the actual product on paper.
A bottle label or product photo can’t always show you exactly what a glitter glue color will look like once it’s applied.
Your completed swatch shows you things such as:
- The actual color
- The amount of glitter
- The level of sparkle
- How opaque or translucent the color appears
- How the color looks once dry
- How the color compares with your other supplies
This makes your chart much more useful than simply keeping a list of the colors you own.
Tips for Making a Better Color Chart
Use the Same Paper for Every Swatch
Try to use the same type of cardstock for all of your samples.
Different papers can affect how colors appear, so using the same paper gives you a more consistent reference.
Let Every Color Dry Before Comparing
Don’t judge the colors while they’re still wet.
Give them plenty of time to dry completely.
Don’t Apply Too Much Product
A small sample is usually enough.
Using too much glitter glue can make it harder to see the actual color and can also increase drying time.
Keep Your Finished Chart Safe
Once your chart is completely dry, store it somewhere protected.
A page protector or craft binder is a simple way to keep your chart from becoming damaged.
Update Your Chart
If you purchase new colors, add them to your collection and update your reference system.
You can also print another copy if you want a fresh chart for a new collection.
Printable Stickles Color Chart
If you’d like to make your own color reference without creating the chart from scratch, I created a printable Stickles Color Chart with 56 labeled one-inch swatch spaces.
Simply print the chart on cardstock, apply your glitter glue samples, and allow them to dry.
You’ll have a personalized color reference that you can keep with your craft supplies.
Get the Printable Stickles Color Chart
This is a labeled digital download, so you can print it at home and create your own color reference using the Stickles colors in your collection.
Final Thoughts
A Stickles color chart is a simple project that can make a big difference when you’re trying to organize your craft supplies.
Once you’ve created your swatches, you’ll have an easy visual reference for choosing colors, comparing shades, and keeping track of your collection.
Instead of opening bottle after bottle to find the right color, you can simply look at your chart and start creating.
And the best part is that your chart is customized to your own collection.
If you’re a scrapbooker, card maker, paper crafter, or just someone who loves collecting craft supplies, a color chart is a simple addition to your craft room organization system.