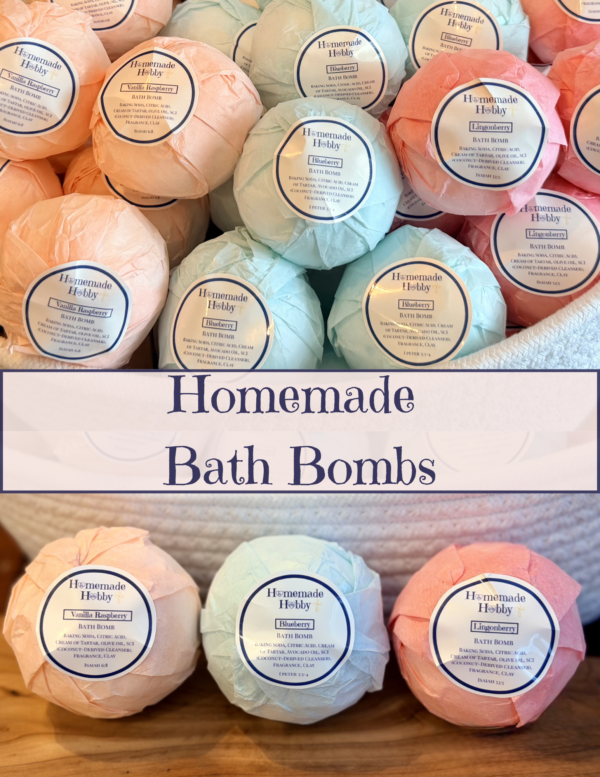
Homemade Bath Bomb Recipe (Perfect Fizz Every Time)
Create your own luxurious, spa-quality with this simple homemade bath bomb recipe that is beginner-friendly! Whether you’re making them for relaxation, gifts, or to grow your handmade business, this formula will give you the perfect fizz, float, and spin every time. There’s nothing better than dropping a handmade bath bomb into warm water and watching it fizz, float, and release beautiful fragrance. The best part? You can make high-quality bath bombs right at home with just a few simple ingredients.
I created a complete guide with bath bomb ideas, troubleshooting tips, and packaging ideas to help you get perfect results every time.
👉 Download
Why make homemade bath bombs?
You probably don’t start making bath bombs just because—it usually comes from a mix of purpose, creativity, and something personal.
1. You wanted something natural and handmade
Store-bought products can feel full of ingredients you can’t control. Making your own lets you choose cleaner, skin-loving ingredients like avocado oil, clays, and gentle surfactants.
2. You enjoy creating beautiful, meaningful products
Bath bombs aren’t just functional—they’re artistic. Colors, scents, textures, even scripture… it’s a way to turn something simple into something special.
3. You saw a business opportunity
Bath bombs are a strong seller—great margins, customizable, and perfect for bundles and gifts.
4. You like the process itself
Mixing, molding, testing recipes—there’s something satisfying about watching them fizz perfectly or getting the texture just right.
Sometimes, the smallest handmade things can bring the greatest peace.
“Commit your work to the Lord, and your plans will be established.” – Proverbs 16:3
Things I use for my homemade bath bomb recipe on my Amazon store front.
⚠️ Caution: SCI (Sodium Cocoyl Isethionate) is a very fine powder that can become airborne when handling. Avoid breathing in the dust by mixing gently and wearing a mask if needed. Use in a well-ventilated area and keep away from eyes.
Why Your Bath Bombs Might Not Turn Out Perfect
If your bath bombs:
- Crack
- Expand
- Don’t fizz properly
…it usually comes down to humidity or ingredient balance.
💡 Good news: I break down exactly how to fix all of these issues inside my ebook so you can avoid wasting ingredients and get consistent results.
👉 Grab the full guide here:
Pro Tips for Perfect Bath Bombs
Let them dry completely before wrapping
Work in low humidity (30–50%)
Pack molds tightly
Add liquids slowly
Don’t want to make them yourself. Shop my Bath Bombs here!

Bath Bomb Recipe
Equipment
- Bath Bomb Mold
Ingredients
- 6 cups 1344g Baking soda
- 1/3 cup 72g Cream of Tartar
- 1/2 cup 60g SCI (sodium Cocoyl Isethionate)
- 2 TBSP 30g Distilled water
- 2.5 TBSP 36g Avocado Oil
- 1.5 TBSP 20g Fragrance Oil
- 3 cups 672g Citric Acid
Instructions
- Mix baking soda, cream of tarter, SCI powder together thoroughly. Break up all clumps.
- Add water and mix throughly.
- Add oil + fragrance oil. Mix evenly until fully incorporated.
- Add citric acid, mix throughly.
- If adding in any colorant, now is when you would add it.
- Should feel like damp sand and hold shape when squeezed
- Pack a little into each side of the mold tightly, then lightly pile up more on each side of the mold so its slightly overfilled.
- Press firmly the two sides of the mold together with steady pressure.
- Tap the back of each side of the mold to help release the bath bomb.
- Holding the bath bomb mold in each hand gently pull apart one side at a time, until the entire bath bomb out of the mold.
- Gently set the bath bomb on a tray
- Work quickly because it will start to dry out, if that happens lightly spray bath bomb mixture or your hands with distilled water and mix it in quickly to prevent fizzing.
- Dry 24–48 hours
- After at least 48 hours they should be hard enough to wrap.
Notes
Take It to the Next Level
Now that you’ve made your first bath bomb, imagine having more unique ideas ready to go—from relaxing lavender to bright citrus blends and everything in between.
My ebook walks you through:
✔ Ingredient breakdowns
✔ Custom scent combinations
✔ Packing techniques
✔ Packaging ideas
✔ Selling tips
Final Thoughts
Making bath bombs at home is simple, fun, and incredibly rewarding. Whether you’re creating them for self-care, gifts, or to sell, mastering the basics will set you up for success.
If you want a step-by-step system that makes everything easier, the full ebook is designed to help you confidently create beautiful bath bombs every time.